Improving Video Lectures For Professors
These tips can make your video lectures of higher quality. This can both remove potential distractions from your content and make your lectures more engaging for your students. As universities around the world go online in response to the pandemic, many professors are struggling with how to make decent video content for their suddenly online classes. I assembled these tips to help faculty at all video skill levels. Note: This page will be updated and expanded as I have time between my own research and now-online classes.
Beginner Video Tips

- Sound is twice as important as video. Get the microphone as close to your mouth as possible (but not directly in front of it). This is easier to do with a separate microphone rather than your webcam. Two popular ones are Blue Snowball USB Mic and the Blue Yeti USB Mic. I use the latter, but it’s possible that something you already own could improve on your setup (e.g., Apple’s earbuds may work better than the farther away MacBook webcam microphone). You can also use a wired lav mic if your computer has a mic input. These are an affordable way to improve your audio, just remember to remove the mic before you walk away from your desk. Note: the Blue Yeti is also sold bundled with a boom arm that is great for podcasts but not video because it covers your face.
- Get a good light source in front of you (behind or to the sides of your camera). Cameras struggle in low light. Avoid too much light behind you unless you are going for that Illuminati face in the shadows look (from backlight) to intimidate your students. I use a lighting kit (see intermediate), but any light additional source you can add behind or to the sides of your camera/monitor can help. Is a desk lamp or two available to supplement your lighting? Consider where windows are located in your office/studio so that the outside light is helping and/or not hurting your setup. A free light source: maximize a blank Word Doc to use your monitor as a light. (For more lighting tips here’s a helpful YouTube Beginner Video Lighting Tutorial)

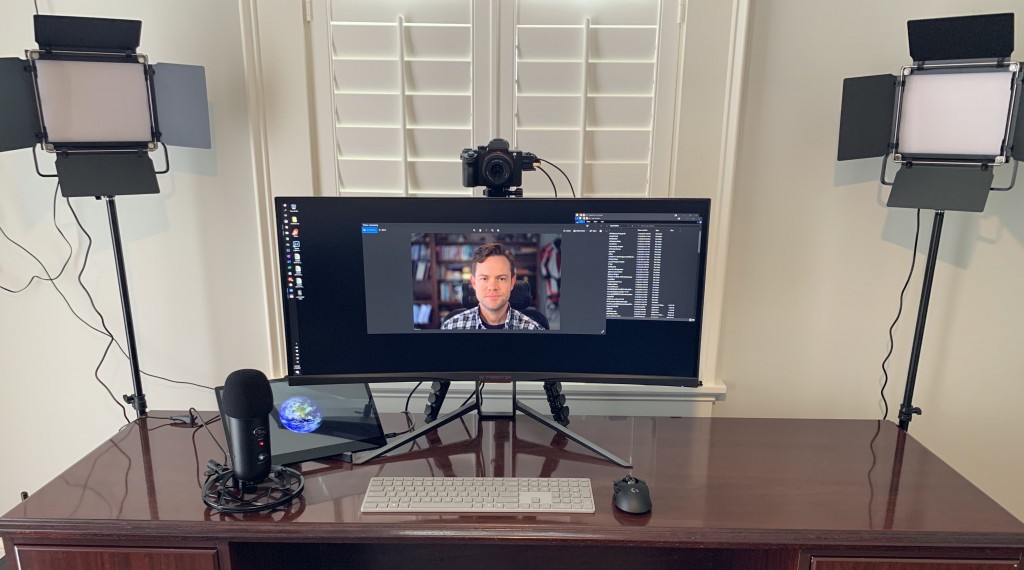
- Get the camera near your eye level. This puts your face at a good angle so students aren’t looking up your nose or down on you. Use a stack of books under your laptop rather than simply angling the screen back. A USB webcam can provide more flexibility for placement (as can the ‘real’ camera route outlined below).
- Look at the camera. It seems obvious, but when presenting slides on your monitor your eyes can easily be looking elsewhere which looks bad in the video. Make sure anything you will be looking at is near the camera to prevent this issue. For instance, on my large monitor, I position my slides in a smaller (unmaximized) window directly below where my camera is located on its tripod.
- Any webcam is sufficient to get started, but there are some quality differences between models. Realize that this is more about replacing a bad quality webcam rather than finding a truly good quality model. If you want good quality, check out the ‘real’ camera info in the intermediate section.
- The background doesn’t matter that much. Sure, pick up anything embarrassing behind you, but realize a) students are used to seeing YouTube videos shot in peoples homes without a ‘studio’ setup, b) that hastily hung blanket or sheet behind you likely looks worse than what it’s hiding (unless its a green screen see intermediate), c) the background is behind the sound, your content, your content’s presentation quality, and the lighting setup in ROI on improving your video.
Intermediate Video Tips
- Use a lighting setup such as the Neewer Bi-color 660 LED Video Light and Stand Kit (YouTube Review). Softboxes give a similar diffuse light to the LED kits for less cost but a greater size. Ring lights are also popular but can be more difficult to set up as they ideally go around the camera rather than off to the sides with the other options. You could also use lights you already own, but the adjustability and wider spread of a video light are both pluses. YouTube ‘DIY softbox’ to see ideas on how to turn a lamp into a softbox cheaply.
- Use a USB microphone such as the Blue Snowball USB Mic or Blue Yeti USB Mic. You could also use a lavalier (lav) mic which can sound great but can be more complicated to add to your setup. Note: the Blue Yeti is also sold bundled with a boom arm that is great for podcasts but not video because it covers your face.
- Trade-in your webcam for a ‘real’ camera with a capture device or free software for supported cameras:
- I use the Elgato Cam Link 4K compact USB/HDMI capture device to connect my Sony a7Rii full-frame camera for higher quality video and blurred out backgrounds, but most other USB HDMI video capture devices*, such as the IOGEAR HDMI to USB Type-C video capture adapter, should work with minimal fuss, but check to see if it is Windows or Mac only, as well as what resolution it supports. As for ease, on my PC the Cam Link simply plugs in without additional software and shows up in the Zoom or vMix just like a webcam. *Note: There are similarly-named USB HDMI video adapters that allow sending video out your USB port to a monitor via HDMI cable which will not work – make sure it is a capture device.
- Since making this guide, most camera companies have created software that will allow at least some of their cameras to work as a webcam (i.e., for zoom or recording lectures) without a capture device. Note that I haven’t used these myself so I don’t know how easy they are to use, but they are a free option. Be sure to double-check that your specific camera is supported. Here are the links to the software: Sony cameras, Canon cameras, Olympus cameras, Nikon cameras, and GoPro Hero 8 only.
- Many real cameras will work, but it needs to support ‘clean HDMI out’. This just means the camera a) has an HDMI port (usually micro or mini so expect to order an adapter cable) and b) sends video output without the extra camera display items such as shutter speed or battery level. I use a Sony a7R ii that I already owned as a photographer, but you don’t need something that nice. My Sony RX100 V point-and-shoot camera also works with similar detail but less background blur. I also tried my GoPro 7 Black and while it worked it wasn’t much better than a webcam. A good camera option is the Sony ZV-1 (an updated version of the RX100 optimized for video).
 Improve your background with bookcases! We academics own a lot of books so proudly display them as your background. In my home office shifting my desk to another wall changed my background from a door to my three bookcases you can see in the image to the right. (I’ve even had a student ask if it was a virtual background because “it looked too good to be real”).
 - Speaking of virtual backgrounds: a green screen can be purchased online starting at $12 so I don’t consider the DIY versions making one out of a bedsheet worth the trouble. Since people have asked I got this Neewer 9 x 15 feet green screen but it is bigger than many people would need. However, I picked up a $3 one inch PVC pipe from a hardware store as a cheap way to hold it up as green screen stands can quickly get expensive. Green screens allow for better virtual backgrounds than zoom and some webcams can pull off by trying to guess where you are in the image. In addition to adding some style to your next zoom meeting, green screens allow you to insert only yourself over your slides (as in the vMix picture above) which blocks much less content than the traditional picture-in-picture layout.
- Learn how to make simple edits in a video editing program. All you need to know is how to snip the ends off of a clip and do a simple dissolve transition between clips. This allows you to make mistakes. When you make a mistake simply stop recording and then start recording on your current slide (or point if you aren’t using slides) and then combine the handful of files at the end with your mistakes on the cutting room floor. Pro tip: pause for two seconds at the beginning of a new recording so that you have room for your transition between clips.
- When deciding what video settings to use, consider YouTube’s recommended settings for 1080p video: MP4 filetype, AAC audio codec, H.264 video codec, and a bitrate of at least 12 Mbps (I use 25 Mbps).
Advanced Video Tips
 Creating an intro video or splash screen (like the one on the right) doesn’t take very long and it can add a professional touch to the beginning of all of your future videos. I made this slash screen using my school headshot, the university logo, vMix for the dynamic title, and copyright-free music from YouTube (see below).
- If you want to add music to your video, use YouTube’s Audio Library to easily find free music that avoids copyright issues. The Audio Library is located inside YouTube Studio (where one manages uploaded videos) in the menu on the left.
- Learn how to set your audio level to a consistent and reasonably loud level. In Adobe Premier: right-click your audio in the timeline > select Audio Gain… > Normalize all peaks to -5 dB
Windows Software
- I started recording lectures with Camtasia which is adequate ($169 education discount) and then moved to vMix which is great (free, $60, $100, $350 depending on features). vMix also offers a free trial of the $350 version without limitations for 60 days so you can try out all the features and decide what you want to pay for. I will expound further on these differences when I get time. One thing that makes vMix great is that it was designed for live video presentations. This means that pretty much anything can be set up to happen with a single button press (“shortcut”). For instance, I set up a shortcut that starts recording, then a few seconds later overlays a title (my name and university), and then removes the title a few seconds after. This increases the professionalism of my videos and is completely automatic. I setup other shortcuts that move which corner of my slides I’m floating over. So pressing 1 on the number pad moves me to the lower left and pressing 1 on the number pad moves me to the lower right. This increases engagement and keeps me from covering something important on a slide – all with a quick tap on my keyboard. Finally, the design towards live video means that recording your video is complete the moment you hit ‘stop recording’. Camtasia, on the other hand, requires significant processing time afterward to combine your image with that of your slides as it is not working on this as you make the video. Professors have enough to do without unnecessarily waiting for technology. Camtasia also choked when I switched from a webcam to a real camera as it couldn’t handle the extra bitrate of the better video feed.
- There are many video editing programs available at various price points and feature sets. The features needed for a good video lecture are pretty basic (i.e., trim ends of clips, a dissolve transition, possibly titles) so ANY video editor app will likely be enough. Some free editors add a watermark or have some other limitation so check for that.
- Adobe Premiere: I personally ‘went all in’ and used Adobe Premiere at first. Some universities have the Adobe suite for free for faculty. If not, with the educational discount, Adobe’s entire suite of 20 apps is $20/month. The pros and cons of Premier are the same: it is the industry-standard, fully-featured editor used by pros including TV stations and movie studios. It can do anything and that can be overwhelming. But that also means there are more helpful tutorials and youtube videos on how to do things than any other alternative. Note: It also is more demanding of computer hardware than other options, so if your computer is particularly slow, I’d look elsewhere.
- Davinci Resolve: Premiere ended up being too slow and clunky to use. I didn’t need pro-grade features cluttering up the process of doing everything. Davinci Resolve now offers a free version of its powerful software that includes everything a non-pro would ever want. It is also faster and easier to use (still more complicated than a basic iPhone/iPad app editor) than Premiere.
Content
- Content is king! While these tips can help make your video lectures higher quality and therefore more engaging for your students, the underlying content is still vitally important. Time spent improving the content is just as important as the delivery.
- Break up longer lectures into subtopics if possible. Multiple shorter lectures tend to be than a single longer lecture both for students’ attention span and subsequent student review (e.g., rewatching topics before an exam). Shorter lectures on a very focused topic are easier to reuse for other (similar) class preps. In this way, some topical planning now could save you time in the future.
- Scripts can help. Some people need to write out their material to not stumble in front of a camera. This is less likely necessary if you are (re)giving lectures you are (very) familiar with. I don’t use scripts, but I do review my lecture PowerPoint before hitting record.
- You will soon realize if you overuse filler words (ah, uh, etc.). This could be a part of your general speech, but it often gets worse when one is nervous – which is the case for many people once you point a camera at them. Experience in front of a camera helps and so does simply knowing the problem exists. Realize that one doesn’t need to eliminate filler words just keep that to a reasonable number.
Last updated: 1/4/2021